Google Analytics Goals. Probably one of the most underrated and underutilized tools within Google Analytics. Small businesses, e-commerce businesses, B2Bs and pretty much all other business with a website, should familiarize themselves with how Google Analytics tools can power their business. Let’s go over a few of the reason why you should start using them today.
Track and measure all of your metrics in one place
Leads, sign-ups and purchases. All examples of key metrics that can be easily tracked with Google Analytics Goals. This provides you with one source of truth with your data. You can then sync your Google Analytics Goals to other platforms like Salesforce CRM or Google Data Studio. In Data Studio, you will then have the ability to create great data visualizations of your goals and key metrics.
Understand the funnel and your user’s journey
Tracking users from the time when they enter your site to when they leave or perform a desired action is tremendously valuable. Google Analytics Goals let you create funnels of this customer journey. These funnels can be simple 2 step journeys or complex e-commerce purchases. One question you may ask before jumping is are google analytics goals retroactive in the data they show? Unfortunately, the answer is no, they are not retroactive and that’s as good a reason as any to start setting them up today.
Here are the 3 basic steps and how to get started.
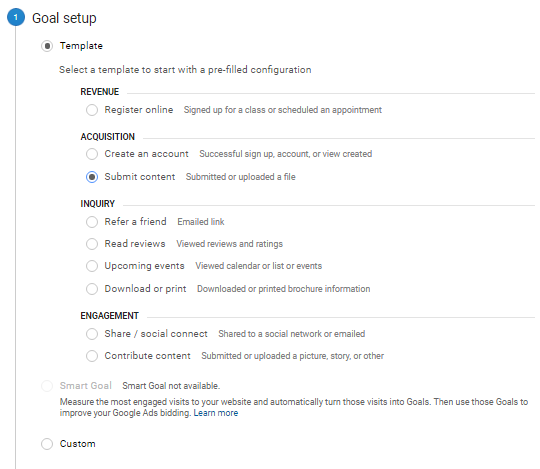
Step 1: Goal setup
Choose your goal template. This is an unnecessary and confusing step as it doesn’t matter which one you choose as all the remaining steps are the same regardless of your choice.

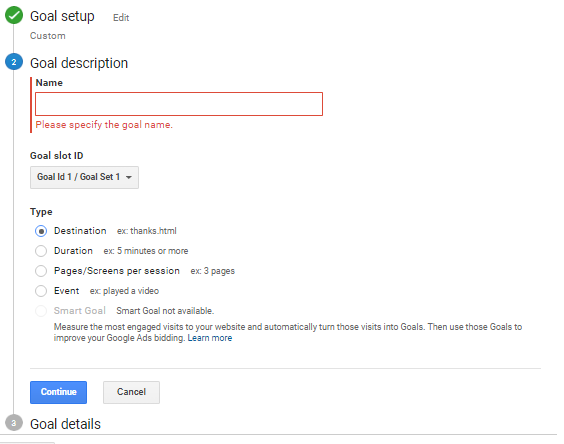
Step 2: Goal description
The second step gives you some great flexibility to set up your goals in a way that works best for you.
- Destination, probably the most common goal, tracks your goal using the final page of the user’s journey. This is used for sign-ups or lead generation tracking.
- Duration is exactly what it sounds like where you track the time by hours, minutes or seconds and is often used for engagement tracking.
- Pages/Screen per session can also be used for tracking engagement and looks at the number of pages or screen that user hit
- Event is a powerful goal type but requires you to set up events using Google Tag Manager (or other tag technology)

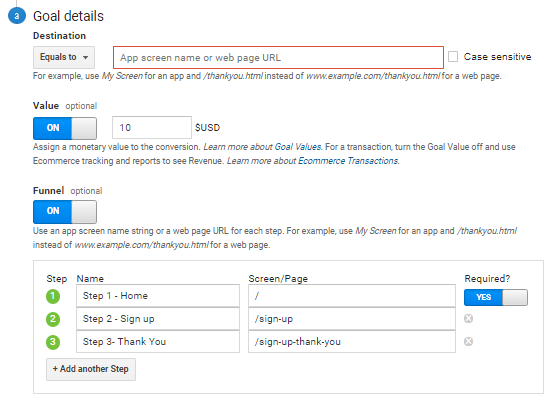
Step 3: Goal details
Goal details are where you will add in your custom variables that match your Goal description. Add in your destination page, duration time, number of pages/screens or event.

Hit “Save” and you are all set! You’ve created a goal. You will be able to see all your conversions from the last 7 days show up on your “Goals” page.
![]()
You can also now see your goal throughout your Google Analytics environment. One of my favourite views within Google Analytics is to look at your goals in the Acquisition section and then by Source / Medium. This is a great way to see how your inbound traffic is driving your site goals. It provides you with conversion rate by Source / Medium which would allow you to better allocate your spend and efforts to better-converting channels.

Other Google Analytics Goals tips:
- You are allowed to create up to 20 Google Analytics Goals.
- Editing your goals is possible at any time but the metrics for the goals will not be retroactive. They will only start recording from that point forward. This makes it all the more critical to set up as early as possible.
- Use the “Verify this Goal” to get a real-time assessment on what your goal conversion rate is.
- Take advantage of the use of regular expressions. For your lead submissions, often you will have different thank you pages. Instead of creating separate goals for each, you could use regular expressions and write something like |thank-you that would then track all your pages that contain “thank-you”